


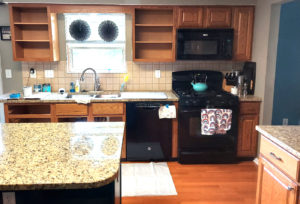
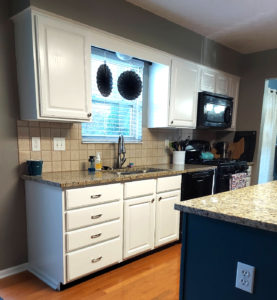
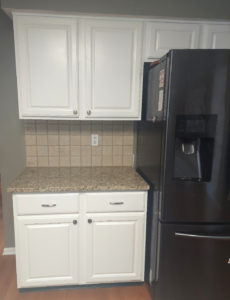
After living in this house for seven years, I finally updated the kitchen cabinets – by doing them myself!!
I worked up to it, starting with our upstairs bathroom vanities, then the island. I knew what I had accomplished in a weekend, and what trickled into the following week, with my previous projects, so I knew I would need to split it up, not attempt all the cabinets at once.
Is everything perfect? Nope, but I love how it turned out. Take a look!
Part 1
I decided to take a Friday off of work to dedicate to painting. Then my husband and kids ended up leaving to visit family out of town for the weekend. It was paint game on and I was in full project mode without any other responsibilities for the weekend.
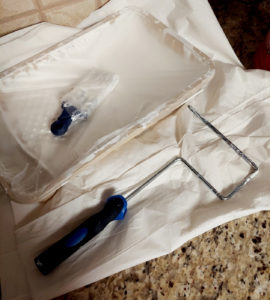
This go round I bought some new/proper tarps, as opposed to the miscellaneous items I used for past projects. I also bought a clean brush so no trace of old paint would mix with the white for the cabinets.
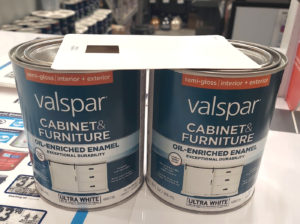
The Valspar Cabinet and Furniture Paint I’ve used for all my projects comes in the white color I wanted so it was easy to grab what I needed the day before – unlike the mix up I had with my paint for the island.
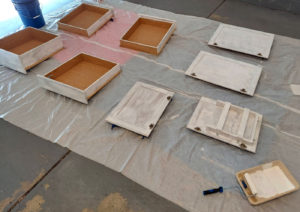
I knew I’d have to do more coats of paint than I did with my previous projects because, 1) it’s white and 2) the high visibility and high touch surfaces. I ended up doing four coats plus touch ups as needed, on everything: base, cabinet doors and drawers.
I put new hardware on and had quite a struggle with the new handles. Despite measuring the same, the holes from the old screws were ever so slightly off and required some extra muscle, tools, and force. In the end we made it work.
Are some of the handles technically only secured on one side with a screw? Did paint get scratched off and need additional work? We’ll never tell.
Part 2
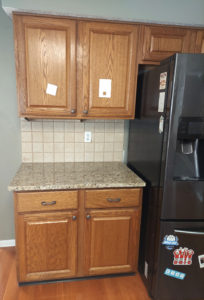
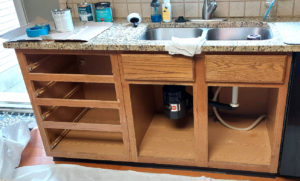
The remaining section of cabinets was significantly smaller than the rest of the painting I’d already done in the kitchen, and thus, went faster.
Everything felt easier. I strategically chose the long 4th of July weekend and told myself there was plenty of time to paint early in the days and have fun in the afternooons and evenings. Great success on all accounts!
I did four coats plus touch ups again and with the exception of one handle, all the new hardware was easily attached.
I’d already successfully painted the majority of the kitchen myself; I knew I could do it because I had, and I was much more relaxed as a result. I was excited about what I had done and knew I was close to the finish line. I had my process and I stuck to it.
DIY Process
When it came to my DIY process for the painting the kitchen cabinets, I stuck with what I had done on the kitchen island, my bathroom vanity before that, and my kids’ bathroom vanity before that. I had found my rhythm and I wasn’t about to veer off course from what had already been successful.
Here’s what I did:
- I cleared out my cabinets and drawers.
- Wiped everything down with a wet cloth.
- Sanded, wiped off the dust.
- Taped around edges of walls, floor, against counters and appliances.
- Painted away. *I didn’t wait over night to flip my cabinet doors and paint the other side or to do another coat on the base and drawers, just a few hours, not exact, just until they looked and felt ready.
- Added new hardware.
- Put everything back together.
- Applied an adhesive liner paper to the bottoms of the cabinets, shelves and the inside of the drawers. *This helped me be a little ‘messy’ in my painting and gave a more polished finished look. It was a pain, but worth it. The liner should last and be easier to clean moving forward.
Finishing Up
I had started to worry about how the paint would hold up over time so I considered doing a top coat, something I hadn’t done on my previous projects. I thought it may be best to protect it, to last longer. I even bought the clear polycrylic top coat that the Lowe’s paint expert recommended, but never ended up using it.
When it came down to it, I was ready to be done and I didn’t want to have to worry about brush strokes or paint clumps again…even if they would be clear. Instead, I kept my paint handy and did random touch ups as they caught my eye in the weeks that followed.
Now it’s time to wash out my brush and put away the paint. I don’t have any other projects on my horizon just yet. For now I’m enjoying my updated kitchen and seeing my vision turned reality through lots of planning and hard work. I also think I’ll treat myself to a manicure!
Leave a Reply